
If you follow me on Instagram, you’ll know that my week has been spent transforming our garden. Shane and I have done absolutely everything ourselves and we couldn’t be happier with what we have achieved, especially as it has only cost us around £150!

We were lucky to have a fantastic garden to work with. The previous owners had already put in some good quality decking and fence panels; it was lovely but the colour wasn’t to our taste. There were also a few plants and shrubs that we couldn’t manage – neither of us are very green fingered and Poppy kept getting her fur matted when climbing in the patch of raspberry plants.
The only change we had made was installing a new shed. We bought a Keter shed when we moved in in June 2018; the one that was there was rotten and ready to collapse. It is thanks to the shed that we got our paints and stains for free. To cut a long story short, we had loads of trouble getting the shed due to a mix up between B&Q and Keter. Our shed arrived a month later than expected and B&Q kindly gave us a £100 gift card as compensation which was an added bonus and covered the cost of a lot of the otger materials.
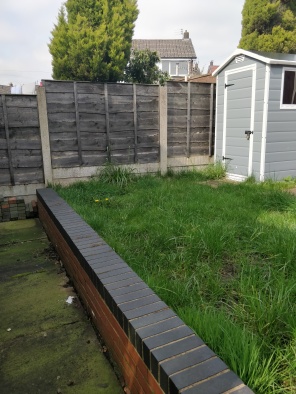
Shane and I both had a week off together so on Monday, we started out DIY garden makeover. This is what it looked like before we started:


We already had all the paints to do our makeover and had been sitting in our hall way for a few months. I used the £100 B&Q compensation gift card to buy them along with another little trick to save even more. B&Q offer a price promise, they will match the price of a product plus an extra 10% off if you can prove that the same item available at a cheaper price within 10 miles. You can also sign up to the B&Q club and get £5 off a £30 spend too.
I used my thrifty skills to find cheaper prices on items at local stores and got our £110 order price matched to just £67.99. I had paid online for our paints and stains and price match has to be done in store. I queried it when I collected my items and they refunded the £32.01 difference onto a gift card; I used that to buy a fire pit and some paint rollers. That meant all of those items cost us absolutely nothing! What is even better is the shed only cost us £160 in the first place thanks to a £100 voucher Shane got as a work incentive.

We picked up some other bits and pieces at B&M to help keep costs down, luckily our local store has a huge garden centre section with lots of bargain materials. In total, the cost of all of the materials (excluding the shed and firepit) should have been around £220. That’s paints, stains, brushes, rollers, patio cleaner, gravel lights, and few little accessories. I think that is an amazing price for such a huge transformation. Of course we spent less thanks to our B&Q gift card.

We started the week by pulling up weeds and getting rid of plants we didn’t want (some of which got relocated to the front garden). Whilst I washed down walls and concrete, Shane pulled down bits of unwanted fencing and spent hours chopping up a huge wooden beam to put in rubble sacks. There were trips to the local tip, lots of time spent covered in paint splattered clothing and a few takeaways were needed to keep us going. It took five consecutive days of hard work but it well worth it because here is what is looks like now…


Looking back over the last five days, there are things that I would do differently, for example, the patio still needs cleaning. We have bought a bottle of patio cleaner to give it a scrub but it would have been much better doing this before starting any work. I would also have tried to keep the garden a bit tidier whilst working; that might have prevented me from accidentally kicking over some grey paint (we now have a lovely splodge of grey grass).

Having said that, I am absolutely chuffed with how it has turned out, especially as neither of us has any proper gardening experience. I am amazed at what we have achieved for our money so all the effort was well worth it and I have actually enjoyed it.
If this has inspired you to give your garden a makeover, you can continue reading the information below to find out exactly what we did and what products we used. Some of the prices might differ slightly as I bought some of our materials last year, of course you can shop around and get different quantities depending on the size of your garden.
Happy Gardening,
Thrifty Clair x
Fences
To prepare the fences we brushed them down using a stiff yard brush. This removed and dirt and debris so we could stain them. We used Cuprinol Silver Copse Ducksback stain. I had two 9l tubs and they have done two coats on twelve fence panels (four of those front and back) and both sides of the garden gate. We still have a small amount left if anything needs touching up.

Concrete Posts
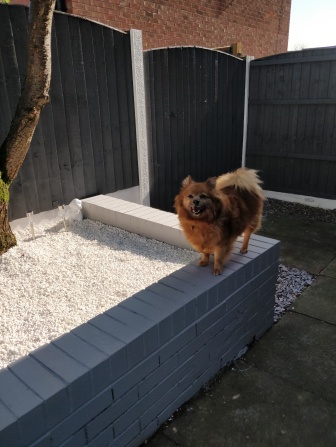
I used Sandtex Ultra Smooth Masonry Paint Pure Brilliant White to paint all the concrete posts and boards around the fences. This made such a dramatic difference and gave a fresh polished look. We have three fence panels that we haven’t stained at all due to the fact that they’re on the side that our neighbours own, we were concerned the fence stain might leak through on to their side so left them unpainted. The panels are a faded grey so they don’t look too out of place, once we painted the posts it instantly made the panels look a lot better. We only need to use one coat of this paint as it went on really thick, other brands might need more coats so it’s worth paying a little bit extra for this brand.

Walls
Once we had done all the fence panels I realised the orange brick wall looked out of place. I decided to go for it and paint that too. We nipped to B&Q and picked up some Goodhome Classic Hudson Smooth Matt Masonry Paint costing £17 for 5l. To prepare the wall I brushed and scraped off as much moss and dirt as I could. A jet wash would have been better but we are waiting to get an outside tap installed. Once cleaned, I used a roller to do the large parts and then used a brush to get into the gaps. It needed two coats to cover it evenly. In hindsight, I wish we had bought the slightly more expensive self cleaning version but I have plenty of paint leftover for when ours needs touching up.

Decking
We were lucky that the previous owners had left a bottle of decking cleaner in the shed when they moved out, we used that to wash down the decking and scrubbed it using a stiff yard brush. One it was dry and free of debris, we stained it using Cuprinol Silver Birch Anti Slip Decking Stain. I had bought two 2.5l tins last year but we used one and half tins just doing the first coat. I had a quick trip to B&Q yesterday to get an extra tin, their price is £25, I used the B&Q price promise trick to get it for just £11.70 by showing them a picture of it for just £13 on the B&M website. The extra tin was enough to do a final coat. Our decking measure 18 foot by 9 foot and we used 3 2.5l tins.

Gravel
We went with two types of stone to finish off our garden, we chose white spar gravel to go around the trees, next to the shed and in the gap behind the decking. I thought the white would break up some of the grey – I just hope that the local cats don’t think it’s a nice big litter tray for them to do their business in! We also used plum grey slate to go around the BBQ area. We bought eighteen bags of gravel in total (fourteen white and four grey) from B&M, they were £3.99 each or three bags for £10, in total we spend £60.

To prepare these spaces, we dug out all the stone that was there, we reused this to level out the old flower beds and to fill the gap behind the shed. We laid down some weed control fabric that we picked up from the Poundworld closing down sale last year, we got four packs for £2. Once this was laid down we poured the gravel on top, this should prevent any dirt or weeds from growing through the newly laid white stone.

To prepare the space behind the decking, we used three bags of ballast – which is a mix of sand and stone – costing £1.99 a bag from B&M. We poured it into the gap and compacted it using a broom to give an even surface. Doing this meant we didn’t need as much gravel to fill the gap.

Edging
To keep the stones in place we added some plastic brick wall edging that we also got from B&M, we used three packs in total costing £6.99 each. They were easy to trim down to fit the space, Shane just used a saw to cut a piece to fill a small gap we had. If you’re using these I would suggest placing them in one at a time then clipped the edges together as this makes it much easier to push them in to the ground.

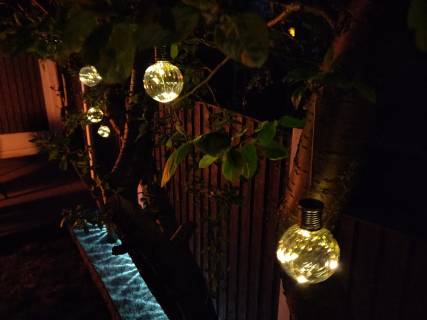
Lighting
To finish off the garden I added some solar lights. I got some Cairo Hanging Bauble Solar tree lights from B&M that have elasticated wires and clips to they can be clipped straight to the tree branch. They are £1.99 each and I bought nine, these have on switches inside the screw off top so you need to undo the tops to switch each one on before hanging.

I also got some Argos Home Stainless Steel Solar Market Lights costing £10. I paid £5 as I used an Argos gift card I bought on Groupon for a fiver. I love the effect of these lights against the white stones thought I don’t think they would be as effective on a darker surface. We do plan on getting some bigger lights at some point but these will do for now.

Reused Items
We kept a load of the large stones and bricks that were already in the garden, these came in handy for making a rockery at the edge of the decking and to fill a gap behind our shed. We layered a few bricks to stop the gravel from spilling out from behind the decking then layered the stones on top.


I painted some of the bricks using the white masonry paint to make a stand for the fire pit to sit on to help protect the newly painted decking. I also painted some of the garden ornaments with the white paint, they have been added to the corner of the old flower beds, they look cute and also prevent the stones from slipping out of the gaps.

Reusing what was already there not only saved us a bit of money but also meant we didn’t have as much rubbish to take to the tip.
Feel free to get in touch with any questions, I’ll be happy to offer any advice if you’re thinking of doing your own garden makeover. X

Looks amazing!!
LikeLiked by 1 person
Thank you, I’m so happy with what we achieved x
LikeLike
Inspirational! Now booked in to finish mine over the next bank holiday
LikeLike
Fantastic! I hope it goes well. We were so lucky we had lovely weather that week. I’m still so pleased with what we achieved for so little. X
LikeLike
That looks amazing and completely different from the before pictures. Super job and we’ll done you two.
Can we book you to makeover our garden next?
LikeLiked by 1 person
Thanks so much, we have redone a few bits this year to help maintain it and we’ve added some extra lights. It’s all simple DIY so definitely worth having a go.
LikeLike
Absolutely amazing
I have thought about the white stones. But am scared that in winter when the neighbours tree will shed the leaves, it will be difficult to clean. Also we get fixed and neighbours 4 cats coming to do there bussness.
Hope all goes well for you
LikeLike
Yes, we are changing the white stones for grey slate this year because though they look great at first, they end up quite discoloured in places. Especially where trees have dropped leaves.
LikeLike